ArduinoとPlaidを使ってマイコンを複製する方法
前置き
自作キーボードのPlaidはお気に入りのキーボードであるが、このキーボードは、ProMicro の代わりにマイコンの ATMega328P を使っており、キーボードには ISP ポートが用意されている。
なので、このキーボードを AVR ライターがわりに使えるのではないか、また、秋月とかで購入した ATMega328P にデータをバックアップしておいて、いざというときはマイコンだけ置き換えて対処する、といったこともできるんじゃないかと思って挑戦してみた。
その挑戦がうまくいったので、その手順を備忘録として残しておく。
作業の手順
作業に使うものは次のとおり。
- Plaid
- Arduino Uno(互換品でOK)
- ブレッドボード・ジャンパーワイヤ(オス-メス)6本
作業の手順は以下のとおり。
ArduinoをAVRライターにする
手順
Arduino IDEをインストール
まず、Arduino の公式サイトでアプリをダウンロードしてインストールする。
Arduinoのシリアルポートの接続先を確認
Arduino IDEを使う方法
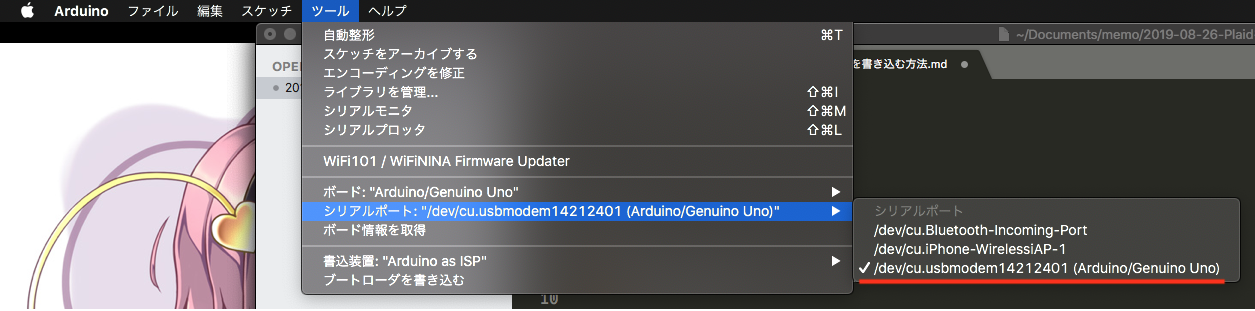
まず、Arduino を接続せずに Auduino IDE を立ち上げ、メニューバーの「ツール」->「シリアルポート」に表示されるデバイスを確認する。
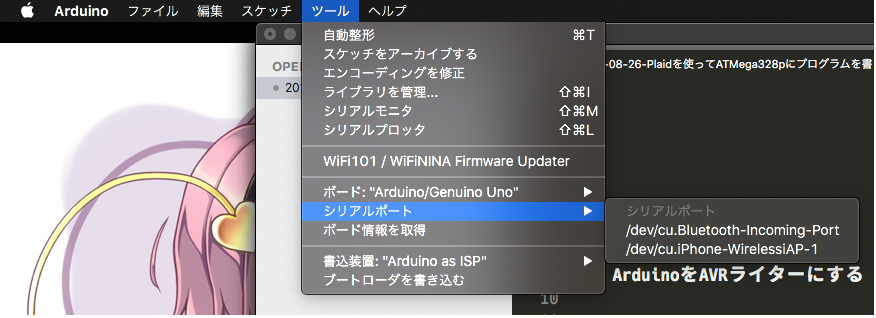
それからArduinoを接続して再度「ツール」->「シリアルポート」を確認すると、Arduinoのシリアルポートの接続先を確認できる。
ターミナルで確認する方法
まず、Arduino を接続しないでターミナルを開いて次のコマンドを実行し、現在接続されているシリアルデバイスを確認する。
1$ ls -la /dev/tty.*
2crw-rw-rw-  1 root  wheel   19,   0  9 25 07:35 /dev/tty.Bluetooth-Incoming-Port
3crw-rw-rw-  1 root  wheel   19,   2  9 25 07:35 /dev/tty.iPhone-WirelessiAP-1
次に、Arduino を接続して同じコマンド実行すると、Arduino のシリアルポートの接続先を確認できる。
1$ ls -la /dev/tty.*
2crw-rw-rw-  1 root  wheel   19,   0  9 25 07:35 /dev/tty.Bluetooth-Incoming-Port
3crw-rw-rw-  1 root  wheel   19,   2  9 25 07:35 /dev/tty.iPhone-WirelessiAP-1
4crw-rw-rw-  1 root  wheel   19, 200 10 10 00:02 /dev/tty.usbmodem14212401 #これが Arduino のシリアルポート
Arduino に ArduinoISP スケッチを書き込む
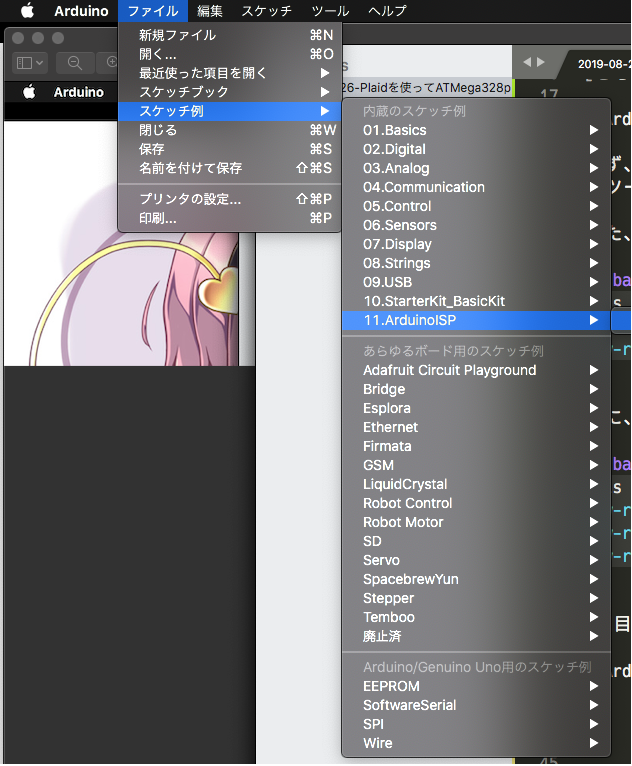
メニューバーの「ファイル」->「スケッチ例」->「11. Arduino ISP」->「ArduinoISP」を選択する。
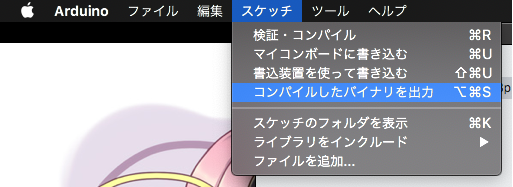
それから、「スケッチ」->「マイコンボードに書き込む」を選択して書き込む。
これで、Arduino を AVR ライターとして使う準備が整ったことになる。
必要なバイナリやライブラリのインストール
以下のコマンドで必要なバイナリやライブラリをインストールできる。ただし、Plaid を使うために QMK Firmware をセットアップすれば必要なバイナリ等もインストールされるので、改めてインストールする必要性は乏しい(はず)。
1$ brew tap osx-cross/avr
2$ brew tap PX4/homebrew-px4
3$ brew update
4$ brew install avr-gcc@8
5$ brew install dfu-programmer
6$ brew install gcc-arm-none-eabi
7$ brew install avrdude
手順
avrdude のインストール
次のコードを実行して avrdude をインストール
1$ brew install avrdude --with-usb
avrdude のテスト起動
次のコードを実行して avrdude を実行してみる。
 1$ avrdude
 2Usage: avrdude [options]
 3Options:
 4  -p <partno>                Required. Specify AVR device.
 5  -b <baudrate>              Override RS-232 baud rate.
 6  -B <bitclock>              Specify JTAG/STK500v2 bit clock period (us).
 7  -C <config-file>           Specify location of configuration file.
 8  -c <programmer>            Specify programmer type.
 9  -D                         Disable auto erase for flash memory
10  -i <delay>                 ISP Clock Delay [in microseconds]
11  -P <port>                  Specify connection port.
12  -F                         Override invalid signature check.
13  -e                         Perform a chip erase.
14  -O                         Perform RC oscillator calibration (see AVR053).
15  -U <memtype>:r|w|v:<filename>[:format]
16                             Memory operation specification.
17                             Multiple -U options are allowed, each request
18                             is performed in the order specified.
19  -n                         Do not write anything to the device.
20  -V                         Do not verify.
21  -u                         Disable safemode, default when running from a script.
22  -s                         Silent safemode operation, will not ask you if
23                             fuses should be changed back.
24  -t                         Enter terminal mode.
25  -E <exitspec>[,<exitspec>] List programmer exit specifications.
26  -x <extended_param>        Pass <extended_param> to programmer.
27  -y                         Count # erase cycles in EEPROM.
28  -Y <number>                Initialize erase cycle # in EEPROM.
29  -v                         Verbose output. -v -v for more.
30  -q                         Quell progress output. -q -q for less.
31  -l logfile                 Use logfile rather than stderr for diagnostics.
32  -?                         Display this usage.
33
34avrdude version 6.3, URL: <http://savannah.nongnu.org/projects/avrdude/>
Arduino と Plaid を接続する
Arduino と ISPポートの接続
Arduino を ISP ライターとして使う場合に Arduino で使うピンと、書き込み先の ATMega328P で使うピンの対応関係は次のとおり。
Arduinoのブートローダー書き込み(2種類) - Qiita
| Arduino | ATMega328P |
|---|---|
| 10 | 1(reset) |
| 11 | 17 |
| 12 | 18 |
| 13 | 19 |
| 5V | (VCC) |
| GND | (GND) |
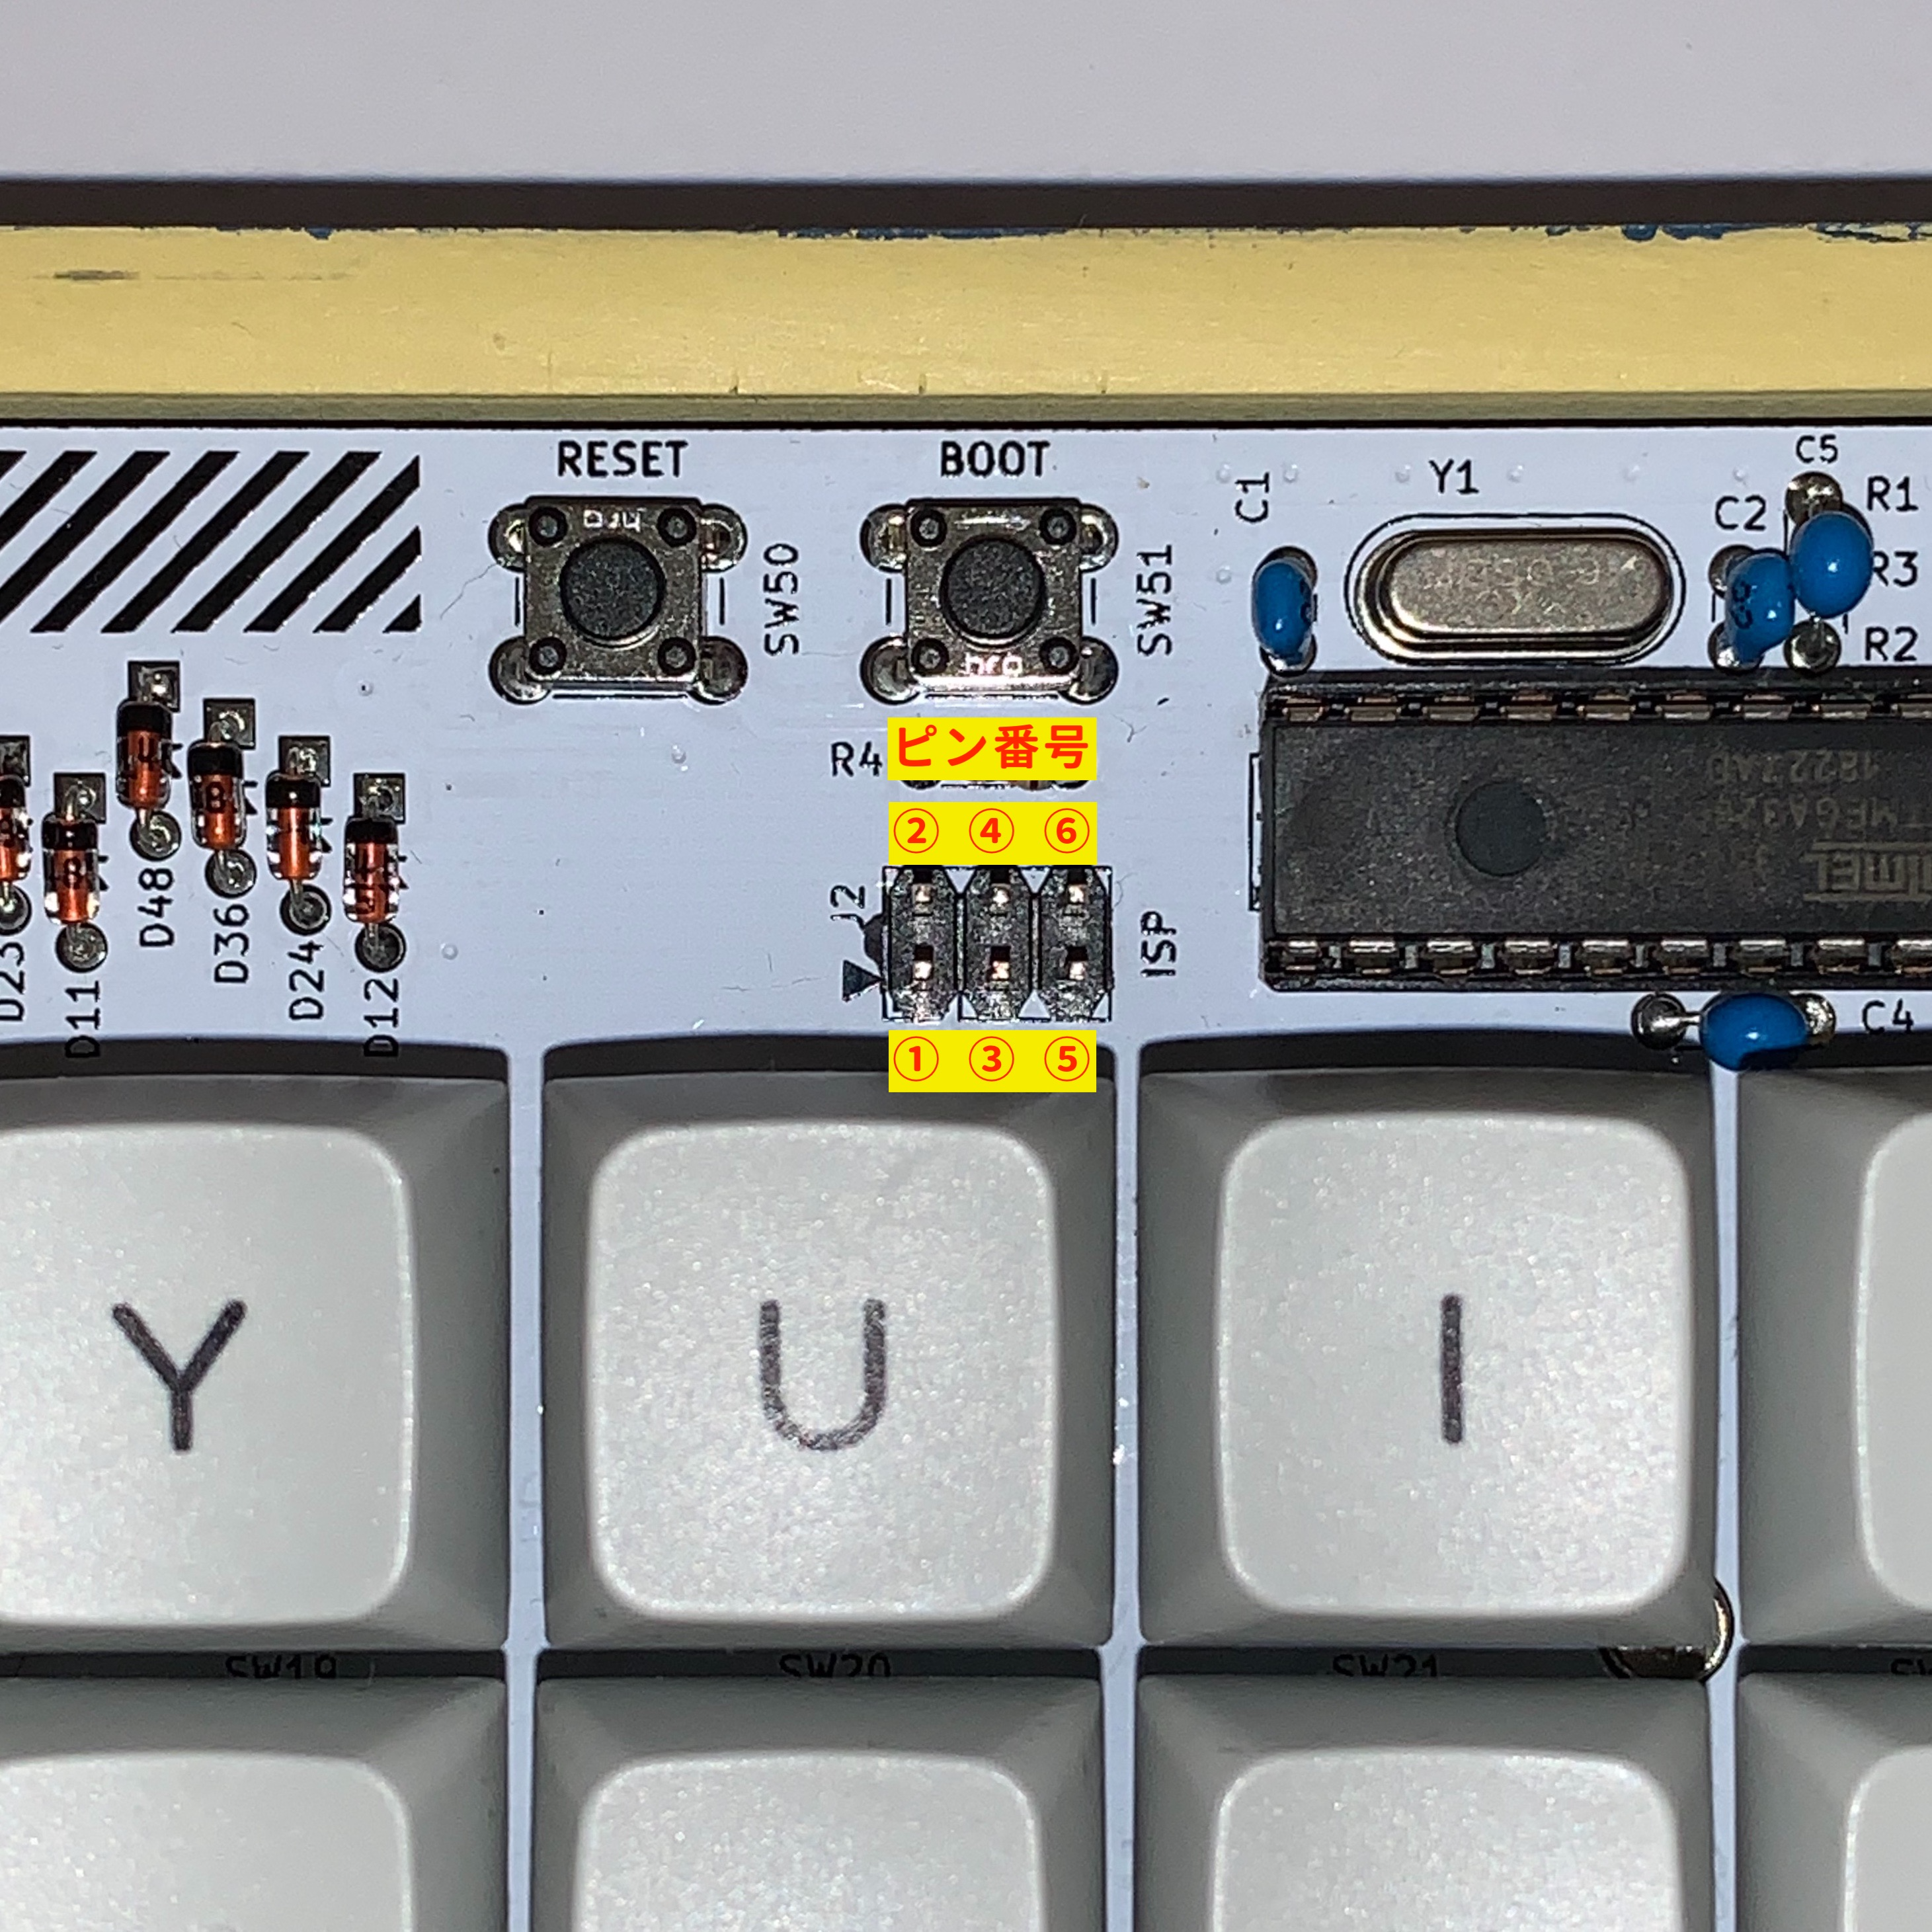
Plaid の ISP ポートと ATMega328P のピン配置の接続
Plaidの回路図で、基板にあるISPポートの各ピンがATMega328Pのどのピンと接続されているか確認する。確認結果は次のとおり。
plaid/plaid.pdf at master · hsgw/plaid
| Plaid(ISP) | ATMega328P |
|---|---|
| 1 | 18 |
| 3 | 19 |
| 4 | 17 |
| 2 | (VCC) |
| 5 | (RESET) |
| 6 | (GND) |
なお、Plaid の基板にあるピンの順番は次の写真のとおり。黒い三角(▲)が指し示すピンが1番ピンである。
Plaid と Arduino の接続
上の2つの表を元に、ArduinoとPlaidを次のとおり接続する。
| Arduino | Plaid |
|---|---|
| 10 | 5(RESET) |
| 11 | 4 |
| 12 | 1 |
| 13 | 3 |
| 5V | 2(VCC) |
| GND | 6(GND) |
Avrdudeの読み込みが可能か確認する
次のコマンドを入力して、デバイスIDを読み取る。無事に読み取れれば次のようなメッセージが出力される。
 1$ avrdude -c avrisp -P COMポート番号 -b 19200 -p m328p
 2
 3avrdude: AVR device initialized and ready to accept instructions
 4
 5Reading | ################################################## | 100% 0.02s
 6
 7avrdude: Device signature = 0x1e950f (probably m328p)
 8
 9avrdude: safemode: Fuses OK (E:FC, H:D0, L:D7)
10
11avrdude done. Thank you.
正常に動く Plaid のデータを読み込む
以上の作業により、Plaid に取り付けている ATMega328P のデータを読み取って、新しい ATMega328P に書き込むことができるようになった。
そのため、次は具体的な作業方法を説明する。
ヒューズビットの読み込み
次のコマンドを入力して、正常に動いている ATMega328P のヒューズビットを読み込んでおく。この値は、新しい ATMega328P に .hex データを書き込んだ後の設定作業で使用する。
 1$ avrdude -c avrisp -P COMポート番号 -b 19200 -p m328p -U lfuse:r:con:h -U hfuse:r:con:h -U efuse:r:con:h
 2avrdude: AVR device initialized and ready to accept instructions
 3Reading | ################################################## | 100% 0.03s
 4avrdude: Device signature = 0x1e950f (probably m328p)
 5avrdude: reading lfuse memory:
 6Reading | ################################################## | 100% 0.01s
 7avrdude: writing output file "con"
 8avrdude: reading hfuse memory:
 9Reading | ################################################## | 100% 0.01s
10avrdude: writing output file "con"
11avrdude: reading efuse memory:
12Reading | ################################################## | 100% 0.01s
13avrdude: writing output file "con"
14
15avrdude: safemode: Fuses OK (E:FC, H:D0, L:D7) #カッコ内の値がヒューズビットの値
16
17avrdude done. Thank you.
hexデータの読み込み
次のコマンドを入力して、正常に動いている ATMega328P に書き込まれているデータを backup.hex ファイルとして読み込む。このファイルを使って、別の ATMega328P に書き込む。
1$ avrdude -c avrisp -P COMポート番号 -b 19200 -p m328p -U flash:r:backup.hex:i
2avrdude: AVR device initialized and ready to accept instructions
3Reading | ################################################## | 100% 0.02s
4avrdude: Device signature = 0x1e950f (probably m328p)
5avrdude: reading flash memory:
6Reading | ################################################## | 100% 19.92s
7avrdude: writing output file "backup.hex"
8avrdude: safemode: Fuses OK (E:FC, H:D0, L:D7)
9avrdude done. Thank you.
新しい ATMega328P への書き込み
上記の作業で正常に動いてる Plaid のデータは読み込めたので、ここで、Plaid に取り付けてある ATMega328P を取り外す。それから、新しい ATMega328P を取り付ける。
取り外す前に、Arduino と Plaid の接続を切るか Arduino と PC の接続を切ること。そして、接続を切ったまま取り外しと取り付けを行い、取り付けが完了したら再接続する。
ブートローダの書き込み
ブートローダが書き込まれていない ATMega328P を使う場合、ブートローダの書き込みを最初に行う。ブートローダ書き込み済みならこの作業は不要である。
Plaid のブートローダには USBaspLoader を USB ブートローダとして使用する。そのため、USBaspLoader が必要になるが、Plaid の開発者の hsgw 氏が Plaid 用の USBaspLoader を公開してくれているので、それを利用する。
1# hsgw氏が作成しているPlaidのブランチをcloneする
2# MasterブランチにPlaid用のファームウェアは存在しないので注意!
3$ git clone -b plaid https://github.com/hsgw/USBaspLoader.git
続いて、USBaspLoader を ATMega328P に書き込む。
 1$ cd USBaspLoader/firmware
 2$ avrdude -c avrisp -P COMポート番号 -b 19200 -p m328p -U flash:w:main.hex:i
 3avrdude: AVR device initialized and ready to accept instructions
 4Reading | ################################################## | 100% 0.03s
 5avrdude: Device signature = 0x1e950f (probably m328p)
 6avrdude: NOTE: "flash" memory has been specified, an erase cycle will be performed
 7To disable this feature, specify the -D option.
 8avrdude: erasing chip
 9avrdude: reading input file "main.hex"
10avrdude: writing flash (30878 bytes):
11Writing | ################################################## | 100% 0.00s
12avrdude: 30878 bytes of flash written
13avrdude: verifying flash memory against main.hex:
14avrdude: load data flash data from input file main.hex:
15avrdude: input file main.hex contains 30878 bytes
16avrdude: reading on-chip flash data:
17Reading | ################################################## | 100% 0.00s
18avrdude: verifying ...
19avrdude: 30878 bytes of flash verified
20avrdude: safemode: Fuses OK (E:FF, H:D9, L:62)
21avrdude done. Thank you.
hex データの書き込み
次のコマンドを入力して、先ほど読み取った backup.hex ファイルを書き込む。
 1$ avrdude -c avrisp -P COMポート番号 -b 19200 -p m328p -U flash:w:backup.hex:i
 2
 3avrdude: AVR device initialized and ready to accept instructions
 4Reading | ################################################## | 100% 0.02s
 5avrdude: Device signature = 0x1e950f (probably m328p)
 6avrdude: NOTE: "flash" memory has been specified, an erase cycle will be performed
 7To disable this feature, specify the -D option.
 8avrdude: erasing chip
 9avrdude: reading input file "backup.hex"
10avrdude: writing flash (30866 bytes):
11Writing | ################################################## | 100% 33.70s
12avrdude: 30866 bytes of flash written
13avrdude: verifying flash memory against backup.hex:
14avrdude: load data flash data from input file backup.hex:
15avrdude: input file backup.hex contains 30866 bytes
16avrdude: reading on-chip flash data:
17Reading | ################################################## | 100% 18.83s
18avrdude: verifying ...
19avrdude: 30866 bytes of flash verified
20avrdude: safemode: Fuses OK (E:FF, H:D9, L:62)
21avrdude done. Thank you.
ヒューズビットの値書き込み
最後に、新しい ATMega328P のヒューズビットに、上記の作業で確認した値を書き込む。
 1$ avrdude -c avrisp -P COMポート番号 -b 19200 -p m328p -U flash:w:backup.hex:i
 2
 3avrdude: AVR device initialized and ready to accept instructions
 4Reading | ################################################## | 100% 0.02s
 5avrdude: Device signature = 0x1e950f (probably m328p)
 6avrdude: NOTE: "flash" memory has been specified, an erase cycle will be performed
 7To disable this feature, specify the -D option.
 8avrdude: erasing chip
 9avrdude: reading input file "backup.hex"
10avrdude: writing flash (30866 bytes):
11Writing | ################################################## | 100% 33.70s
12avrdude: 30866 bytes of flash written
13avrdude: verifying flash memory against backup.hex:
14avrdude: load data flash data from input file backup.hex:
15avrdude: input file backup.hex contains 30866 bytes
16avrdude: reading on-chip flash data:
17Reading | ################################################## | 100% 18.83s
18avrdude: verifying ...
19avrdude: 30866 bytes of flash verified
20avrdude: safemode: Fuses OK (E:FF, H:D9, L:62)
21avrdude done. Thank you.
動作確認
ここまでの作業が終わったら、Arduino から Plaid を外し、Plaid と PC を接続して入力テストを行う。
作業がきちんとできていれば、それまでと同様に Plaid が使えるはずである。