RClone を使って Klipper の設定をバックアップする方法
前置き
Raspberry Pi に Klipper と FluiddPi をインストールして色々と設定を行っていますが、万が一の事態に備えて、RClone を使って設定ファイルをクラウドストレージに定期的にバックアップするようにしまし た。
そこで、備忘録として実施した手順をメモします。
手順
RClone のインストール
- ホストPCから Raspberry Pi に SSH 接続する
sudo lsを実行して root ユーザのパスワードを入力しておくcurl https://rclone.org/install.sh | sudo bashでインストール用スクリプトをダウンロードして実行する
RClone の設定
RClone をインストールしたら、rclone config を実行して設定ダイアログを起動します。
なお、ここでは過去に行った設定( Fuliddpi_backup )が表示されています。
 1Current remotes:
 2
 3Name                 Type
 4====                 ====
 5Fluiddpi_backup      drive ← 過去に行った設定
 6
 7e) Edit existing remote
 8n) New remote
 9d) Delete remote
10r) Rename remote
11c) Copy remote
12s) Set configuration password
13q) Quit config
14e/n/d/r/c/s/q> n
n を選択して新しい設定を開始します。
1name> test
設定の名前を入力します。名前は任意のものを設定します。
 1Option Storage.
 2Type of storage to configure.
 3Enter a string value. Press Enter for the default ("").
 4Choose a number from below, or type in your own value.
 5 1 / 1Fichier
 6   \ "fichier"
 7 2 / Alias for an existing remote
 8   \ "alias"
 9 3 / Amazon Drive
10   \ "amazon cloud drive"
11 4 / Amazon S3 Compliant Storage Providers including AWS, Alibaba, Ceph, Digital Ocean, Dreamhost, IBM COS, Minio, SeaweedFS, and Tencent COS
12   \ "s3"
13 5 / Backblaze B2
14   \ "b2"
15 6 / Better checksums for other remotes
16   \ "hasher"
17 7 / Box
18   \ "box"
19 8 / Cache a remote
20   \ "cache"
21 9 / Citrix Sharefile
22   \ "sharefile"
2310 / Compress a remote
24   \ "compress"
2511 / Dropbox
26   \ "dropbox"
2712 / Encrypt/Decrypt a remote
28   \ "crypt"
2913 / Enterprise File Fabric
30   \ "filefabric"
3114 / FTP Connection
32   \ "ftp"
3315 / Google Cloud Storage (this is not Google Drive)
34   \ "google cloud storage"
3516 / Google Drive
36   \ "drive"
3717 / Google Photos
38   \ "google photos"
3918 / Hadoop distributed file system
40   \ "hdfs"
4119 / Hubic
42   \ "hubic"
4320 / In memory object storage system.
44   \ "memory"
4521 / Jottacloud
46   \ "jottacloud"
4722 / Koofr
48   \ "koofr"
4923 / Local Disk
50   \ "local"
5124 / Mail.ru Cloud
52   \ "mailru"
5325 / Mega
54   \ "mega"
5526 / Microsoft Azure Blob Storage
56   \ "azureblob"
5727 / Microsoft OneDrive
58   \ "onedrive"
5928 / OpenDrive
60   \ "opendrive"
6129 / OpenStack Swift (Rackspace Cloud Files, Memset Memstore, OVH)
62   \ "swift"
6330 / Pcloud
64   \ "pcloud"
6531 / Put.io
66   \ "putio"
6732 / QingCloud Object Storage
68   \ "qingstor"
6933 / SSH/SFTP Connection
70   \ "sftp"
7134 / Sia Decentralized Cloud
72   \ "sia"
7335 / Sugarsync
74   \ "sugarsync"
7536 / Tardigrade Decentralized Cloud Storage
76   \ "tardigrade"
7737 / Transparently chunk/split large files
78   \ "chunker"
7938 / Union merges the contents of several upstream fs
80   \ "union"
8139 / Uptobox
82   \ "uptobox"
8340 / Webdav
84   \ "webdav"
8541 / Yandex Disk
86   \ "yandex"
8742 / Zoho
88   \ "zoho"
8943 / http Connection
90   \ "http"
9144 / premiumize.me
92   \ "premiumizeme"
9345 / seafile
94   \ "seafile"
95Storage> 16
利用するオンラインストレージを聞かれるので、利用したいものを選択します。今回は Google Drive を使うので、16 を選択しています。
 1Option client_id.
 2Google Application Client Id
 3Setting your own is recommended.
 4See https://rclone.org/drive/#making-your-own-client-id for how to create your own.
 5If you leave this blank, it will use an internal key which is low performance.
 6Enter a string value. Press Enter for the default ("").
 7client_id>
 8Option client_secret.
 9OAuth Client Secret.
10Leave blank normally.
11Enter a string value. Press Enter for the default ("").
12client_secret>
client_id と client_secret を聞かれますが、空欄でOKです。
 1Option scope.
 2Scope that rclone should use when requesting access from drive.
 3Enter a string value. Press Enter for the default ("").
 4Choose a number from below, or type in your own value.
 5 1 / Full access all files, excluding Application Data Folder.
 6   \ "drive"
 7 2 / Read-only access to file metadata and file contents.
 8   \ "drive.readonly"
 9   / Access to files created by rclone only.
10 3 | These are visible in the drive website.
11   | File authorization is revoked when the user deauthorizes the app.
12   \ "drive.file"
13   / Allows read and write access to the Application Data folder.
14 4 | This is not visible in the drive website.
15   \ "drive.appfolder"
16   / Allows read-only access to file metadata but
17 5 | does not allow any access to read or download file content.
18   \ "drive.metadata.readonly"
19scope> 1
どのスコープ範囲を適用するか聞かれるので、フルアクセス可能な 1 を選択します。
(書き込みオンリーの権限がないため、止むを得ずフルアクセスを選択しています。)
1Option root_folder_id.
2ID of the root folder.
3Leave blank normally.
4Fill in to access "Computers" folders (see docs), or for rclone to use
5a non root folder as its starting point.
6Enter a string value. Press Enter for the default ("").
7root_folder_id>
root_folder_id を聞かれますが、空欄のままでOKです。
1Option service_account_file.
2Service Account Credentials JSON file path.
3Leave blank normally.
4Needed only if you want use SA instead of interactive login.
5Leading `~` will be expanded in the file name as will environment variables such as `${RCLONE_CONFIG_DIR}`.
6Enter a string value. Press Enter for the default ("").
7service_account_file>
service_account_file について聞かれますが、こちらも空欄でOKです。
1Edit advanced config?
2y) Yes
3n) No (default)
4y/n> n
アドバンスト設定を行うか聞かれますので、 n を入力してアドバンスト設定を行わず先に進みます。
1Use auto config?
2 * Say Y if not sure
3 * Say N if you are working on a remote or headless machine
4
5y) Yes (default)
6n) No
7y/n> n
オート設定を行うか聞かれますが、SSH 接続で設定しているので n を選択します。
1Option config_token.
2For this to work, you will need rclone available on a machine that has
3a web browser available.
4For more help and alternate methods see: https://rclone.org/remote_setup/
5Execute the following on the machine with the web browser (same rclone
6version recommended):
7 rclone authorize "drive" "eyJzY29wZSI6ImRyaXZlIn0"
8Then paste the result.
9Enter a value.
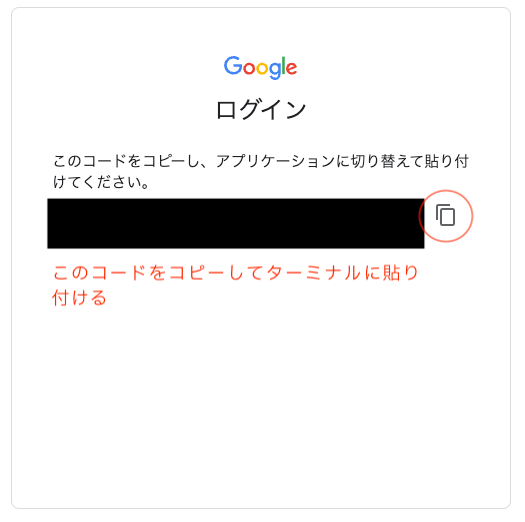
10config_token> ***
ダイアログに「RClone が使える PC で以下のコードを実行して結果を貼り付けること(意訳)」と指示が表示されますので、指示に従って手元の PC で rclone authorize "drive" "eyJzY29wZSI6ImRyaXZlIn0" を実行します。
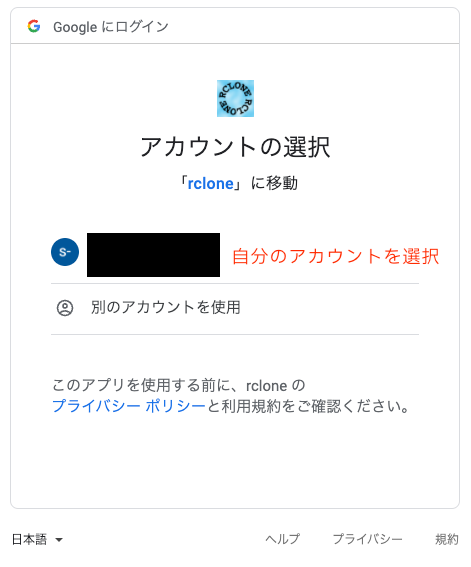
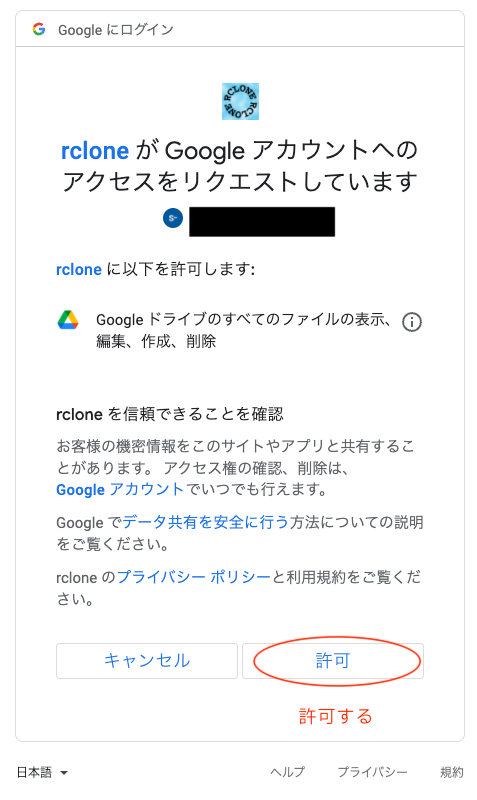
すると、起動したローカルサーバの URL が表示されますので、その URL にアクセスすると Google のアクセス権限設定ページにジャンプします。
12022/04/19 13:09:19 NOTICE: Config file "/home/***/.config/rclone/rclone.conf" not found - using defaults
22022/04/19 13:09:19 NOTICE: If your browser doesn't open automatically go to the following link: http://127.0.0.1:53682/auth?state=hogehoge
32022/04/19 13:09:19 NOTICE: Log in and authorize rclone for access
42022/04/19 13:09:19 NOTICE: Waiting for code...
1Configure this as a Shared Drive (Team Drive)?
2
3y) Yes
4n) No (default)
5y/n> n
今回使う Google Drive がチームで使うものか聞かれますが、私の Google Drive は個人用なので n を選択します。
 1--------------------
 2[test]
 3type = drive
 4scope = drive
 5token = {"access_token":"***",...}
 6team_drive =
 7--------------------
 8y) Yes this is OK (default)
 9e) Edit this remote
10d) Delete this remote
11y/e/d> y
これまでの選択に基づいた設定結果が表示されますので、問題がなれば y を選択します。
 1Current remotes:
 2
 3Name                 Type
 4====                 ====
 5Fluiddpi_backup      drive
 6test                 drive
 7
 8e) Edit existing remote
 9n) New remote
10d) Delete remote
11r) Rename remote
12c) Copy remote
13s) Set configuration password
14q) Quit config
15e/n/d/r/c/s/q>
設定完了後のリモートドライブの一覧が表示されます。
設定が上手くできたか確認するため、 rclone ls Fluiddpi_backup: を実行してリモートドライブの内容が表示されるか確認します。きちんと設定できていれば、Google Drive に保存しているファイルがリストアップされます。
1pi@fluiddpiender3:~ $ rclone ls Fluiddpi_backup:
2    10138 FluiddPi_Prusa/klipper_config/printer.cfg
3    10138 FluiddPi_Prusa/klipper_config/printer-20220110_020804.cfg
4    10152 FluiddPi_Prusa/klipper_config/printer-20220110_020020.cfg
5    ...
続いて、Cron で定期的に実行するバックアップスクリプトを作成します。スクリプトは ~/klipper_backup.sh としました。
なお、バックアップ先の Google Drive には、あらかじめ FluiddPi_Ender3 という名前でディレクトリを作成しています。
1#!/bin/bash
2rclone copy klipper_config/ Fluiddpi_backup:FluiddPi_Ender3/klipper_config
3rclone copy -L klipper_logs/ Fluiddpi_backup:FluiddPi_Ender3/klipper_logs
スクリプトを作成したら、 chmod 777 ~/klipper_backup.sh コマンドでスクリプトに実行権限を与えます。
それから crontab -e で Cron の設定ファイルを開き、バックアップスクリプトを実行する日時を設定します。ここでは、毎日夜中の2時15分にバックアップを実行する設定にしています。
 1# Edit this file to introduce tasks to be run by cron.
 2#
 3# Each task to run has to be defined through a single line
 4# indicating with different fields when the task will be run
 5# and what command to run for the task
 6#
 7# To define the time you can provide concrete values for
 8# minute (m), hour (h), day of month (dom), month (mon),
 9# and day of week (dow) or use '*' in these fields (for 'any').
10#
11# Notice that tasks will be started based on the cron's system
12# daemon's notion of time and timezones.
13#
14# Output of the crontab jobs (including errors) is sent through
15# email to the user the crontab file belongs to (unless redirected).
16#
17# For example, you can run a backup of all your user accounts
18# at 5 a.m every week with:
19# 0 5 * * 1 tar -zcf /var/backups/home.tgz /home/
20#
21# For more information see the manual pages of crontab(5) and cron(8)
22#
23# m h  dom mon dow   command
2415 2 * * * /home/pi/klipper_backup.sh
以上で設定完了です。これで毎日同じ時間にバックアップが実行されます。