Klipper & Moonraker & FluiddPi でタイムラプス動画を撮影する方法
前置き
Klipper & Moonraker & FluiddPi の組み合わせで 3Dプリンタの印刷の様子をタイムラプス動画にすることに成功しましたので、その方法をまとめます。
なお、Klipper などのバージョンは次のとおりです。
- fluidd
- v1.16.2
- klipper
- v0.10.0-208-g247cd753
- moonraker
- v0.7.1-273-g0a541bb
手順の概要
手順を簡単にまとめると次のとおりとなります。なお、カメラの設定は終わっている前提です。
- 専用のスクリプトをインストールする
- Klipper と Moonraker の設定ファイルを編集する
- スライサーにカスタム G-Code を追加する
手順の詳細
専用のスクリプトのインストール
タイムラプス動画は、次のスクリプトを使って撮影します。
https://github.com/mainsail-crew/moonraker-timelapse
このスクリプトは、Raspberry Pi に SSH 接続してから次のコマンドを実行すればインストールできます。
1cd ~/
2git clone https://github.com/mainsail-crew/moonraker-timelapse.git
3bash ~/moonraker-timelapse/install.sh
設定ファイルの編集
スクリプトをインストールしたら moonraker.conf ファイルに必要な設定を追加します。私が追加した設定は次のとおりです。
なお、moonraker.conf ファイルはFluiddPi の Configuration から編集できます。
- 撮影時にプリントヘッドを中心に移動させる
- プリントヘッドの移動前にフィラメントを 1mm 引き込む
- トラベル速度を 90mm/s に設定(デフォルトだと高速過ぎてうるさいので)
- プリント後に自動で撮影した画像をレンダリングする
 1[update_manager timelapse]
 2type: git_repo
 3primary_branch: main
 4path: ~/moonraker-timelapse
 5origin: https://github.com/mainsail-crew/moonraker-timelapse.git
 6
 7[timelapse]
 8##   Following basic configuration is default to most images and don't need
 9##   to be changed in most scenarios. Only uncomment and change it if your
10##   Image differ from standart installations. In most common scenarios
11##   a User only need [timelapse] in there configuration.
12#output_path: ~/timelapse/
13##   Directory where the generated video will be saved
14#frame_path: /tmp/timelapse/
15##   Directory where the temporary frames are saved
16#ffmpeg_binary_path: /usr/bin/ffmpeg
17##   Directory where ffmpeg is installed
18#enabled: True
19#mode: layermacro
20#snapshoturl: http://localhost:8080/?action=snapshot
21#gcode_verbose: True
22parkhead: true
23parkpos: center
24#park_custom_pos_x: 0.0
25#park_custom_pos_y: 0.0
26#park_custom_pos_dz: 0.0
27park_travel_speed: 90
28park_retract_speed: 25
29#park_extrude_speed: 15
30park_retract_distance: 1.0
31#park_extrude_distance: 1.0
32#hyperlapse_cycle: 30
33autorender: True
34#constant_rate_factor: 23
35#output_framerate: 30
36#pixelformat: yuv420p
37#time_format_code: %Y%m%d_%H%M
38#extraoutputparams:
39#variable_fps: False
40#targetlength: 10
41#variable_fps_min: 5
42#variable_fps_max: 60
43#flip_x: False
44#flip_y: False
45#duplicatelastframe: 0
46#previewimage: True
47#saveframes: False
続いて、printer.cfg に次の設定を追加します。
1[include timelapse.cfg]
これで Klipper、Moonraker、FluiddPi 側の設定は完了です。
スライサーの設定
タイムラプス動画用の写真は、各レイヤーの印刷が終わったタイミングで撮影しますので、スライサーで G-Code を生成する際に、レイヤー移動前に撮影コマンドを実行するように設定します。
PrusaSlicer/SuperSlicer を使っている場合、Printer Settings -> Custom G-code -> Before layer change Gcode と画面を開き、TIMELAPSE_TAKE_FRAME G-Code として追加します。
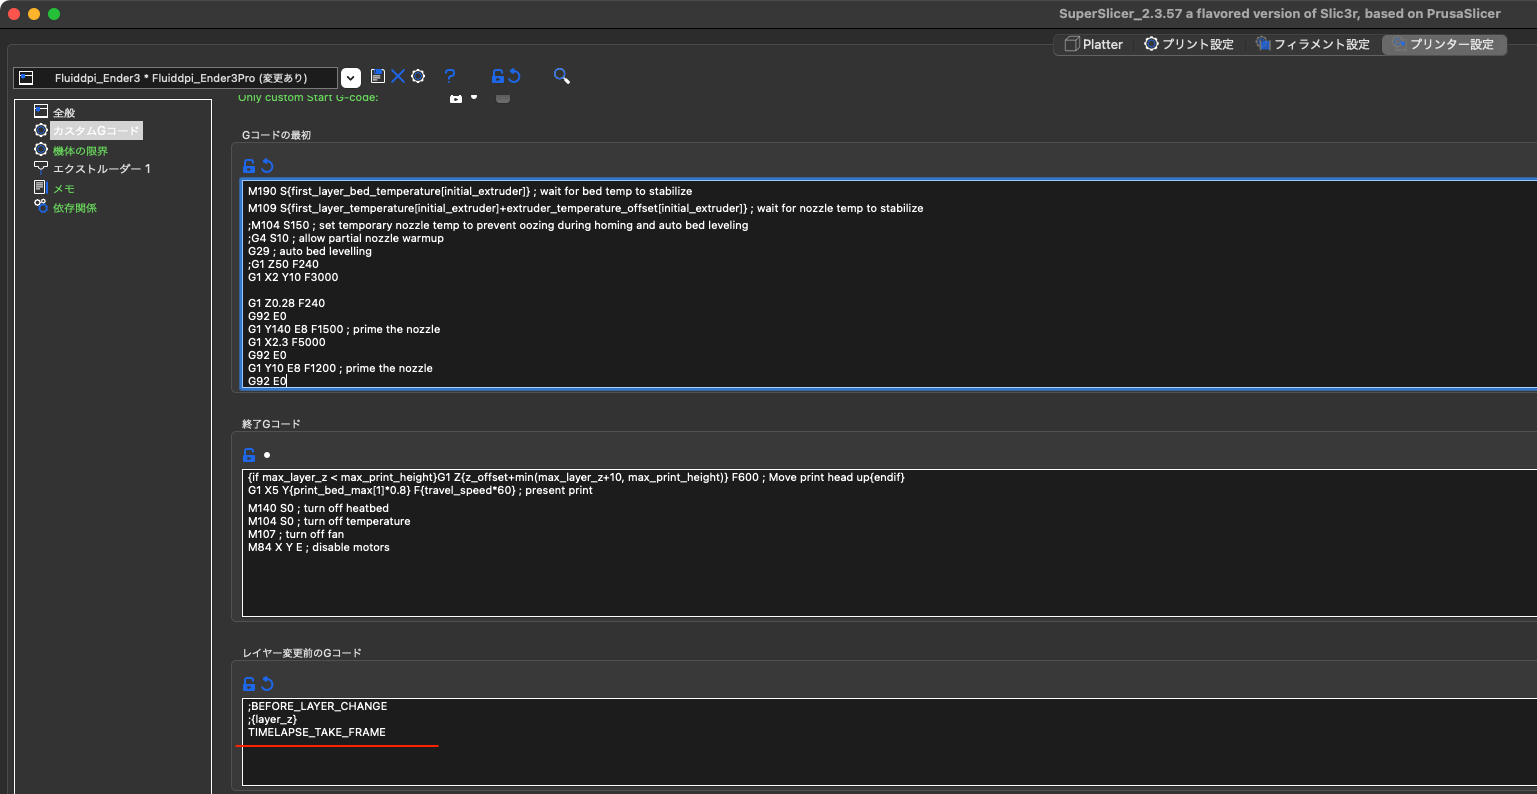
これで、STL ファイルをスライスして G-Code を生成すると、レイヤー移動前に撮影コマンドが自動的に挿入されますので、後は G-Code をアップロードして印刷すればタイムラプス動画を撮影できます。
撮影されたタイムラプス動画は、/home/pi/timelapse に mp4 形式で保存されていますので、ホストPCから scp pi@fluiddpi.local:~/timelapse/timelapse_xxx.mp4 ~/Downloads/ コマンドを実行するなどしてダウンロードしてください。
蛇足
もし、printer.cfg から PAUSE マクロを削除していた場合、印刷を開始すると !! Error evaluating 'gcode_macro TIMELAPSE_TAKE_FRAME:gcode': UndefinedError: 'dict object' has no attribute 'gcode_macro pause' というエラーが発生して印刷がストップしてしまいます。
エラーの原因は、スクリプトの [gcode_macro TIMELAPSE_TAKE_FRAME] セクション内に {printer.configfile.settings['gcode_macro pause'].rename_existing} というコードがあるためです。そのため、printer.cfg から PAUSE マクロを追加すれば解消できます。
1[gcode_macro PAUSE]
2rename_existing: BASE_PAUSE
3gcode:
4    PAUSE
なお、rename_existing は、既存の同名コマンドを引数に指定したコマンド名にリネームして、実質的に既存の同名コマンドを上書きするものです。
rename_existing:
This option will cause the macro to override an existing G-Code command and provide the previous definition of the command via the name provided here. This can be used to override builtin G-Code commands. Care should be taken when overriding commands as it can cause complex and unexpected results. The default is to not override an existing G-Code command. https://www.klipper3d.org/Config_Reference.html?h=rename#gcode_macro